Archive for the ‘growing from seed’ Category

I just have to talk about canning again–IT’S THAT IMPORTANT!!

My husband just alerted me to this little item of recent news:

http://www.kplu.org/post/home-canning-hobby-leads-near-fatal-medical-emergency


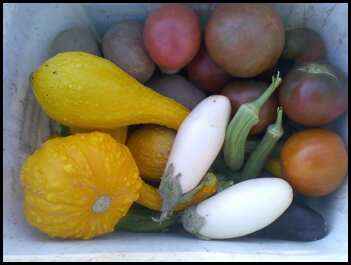
Now that the gardens are producing a harvest, the canning and preserving season is upon us. I’ve already canned eight quarts of Callaloo (Amaranth) Greens, six quarts of Kale Greens, 10 Quarts of Green and Yellow Wax beans, and I have frozen about 10 Pounds of Cabbage. I have also harvested about a peck of Eggplants (didn’t can em because we ate em!  Recipe below. . .), and we have dug about 10 pounds of potatoes, and a bushel of onions.

EXIF_JPEG_T422

When I read the article above, I thought I’d write a little reminder about CANNING stuff.  I sure hope that people AREN’T dusting off their old canning recipes, and I hope that people ARE using the correct equipment and recipes!  No cutting of corners allowed!  This fellow didn’t, and nearly lost his life. . .


What really bothers me is that the title of this article gives the impression that Home Canning is in and of itself a dangerous activity that will result in poisoning. The comments by this man’s daughter that there will be “no more canning” also lends credence to this wrongful statement. What it actually should have said is that ERRORS made in Home Canning Hobby Leads to Near-Fatal Medical Emergency. I have been canning for years, and I am currently waiting for Penn State University to let me know when their next Master Preserver class will be. While I wait, I am taking an online class offered by the National Center for Home Food Preservation.  I can both vegetables and meats, and I am constantly warning people to rely ONLY on scientifically tried and true recipes when canning. Canning is not the time to cut any corners at all, nor is it the time to display your prowess as a gourmet cook. Foods are best canned SIMPLY, and one can then use them in fancy recipes LATER, after they are decanted. If the man named in the above article  had followed the recommendations of the Ball Blue Book and the National Center for Home Food Preservation, he would have had no problems. Elk  (and venison) is to be canned for 90 minutes (quart jars) at 10 pounds pressure in a weighted gauge canner or 11 pounds pressure in a dial gauge canner (at elevations of 1000 feet above sea level or less), or at 75 minutes (pints) at 10 pounds pressure (weighted gauge) or 11 pounds pressure (dial gauge), elevations of 1000 feet above sea level or less. 

Please notice that in this recipe as in ALL canning recipes, the size of the jar, the type of pressure canner and the altitude of your town or city are all important considerations to the process.  For example, higher altitudes require longer processing times.   (For your information, Harrisburg is 320 feet above sea level.)  No exceptions and no shortcuts are allowed in this recipe and it may never be altered in any way. This is also the correct recipe for canning beef. Home canning is safe, enjoyable and economical, but only if you follow the rules.

EXIF_JPEG_T422

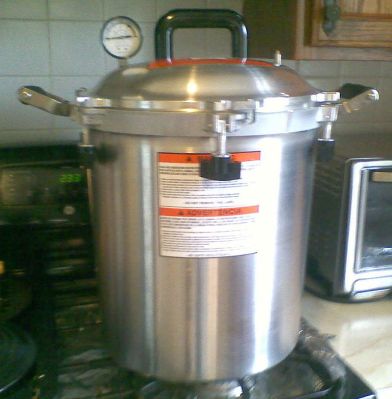
This is my pride and joy, my beautiful new All American Pressure canner.  This beauty can CAN up to 14 quarts of food at a time.  . .

It is perfectly safe to borrow or buy a used canner, but your first trip should be to your local University or College Extension service to have the Dial Gauge canner pressure-tested for safety.  If you buy or borrow a used Weighted Gauge Pressure Canner, you do not need to have it tested, but you must buy all new working parts for it, for safety (the working parts include the rubber gasket or sealing ring, the overpressure plug, the vent pipe assembly and the interlock assembly).  You do not have to replace the Weighted Gauge.  These parts are not really that expensive.  If you own any type of Pressure Canner it really is a good idea to replace all of the parts every other year anyway.  You should also never DROP a canner, and you should never use a canner that is dented or warped.  Here’s a good place to buy replacement parts:

http://www.pressurecooker-outl…

I also want to remind everyone that according to the USDA, any canning recipe OLDER than 1988 is DANGEROUS. The old recipes that Mom and Grandma may have used are not good. You CANNOT preserve Corn, Greens and Green Beans in a boiling water bath canner.  No matter how long you boil them at 212 degrees, the food will not be safe to eat.  It will not be safe, even if you boil it all over again before eating it.  The Botulism Bacteria cannot be boiled away.  The man in the article mentioned above learned this to his sorrow. There are no recipes for canning low acid foods such as meats and vegetables in a boiling water bath canner.  I do have a 100-year-old cookbook that does give some times for canning stuff like corn in a boiling water bath, but I will never give out that information to anyone.  The fact is that these recipes  were no good back then, but people simply took a chance because there was no better information available. Please don’t use or rely on any “old fashioned” recipes. The Ball Blue Book, which is actually sold in the Giant and Karns Supermarkets, is fairly inexpensive (about $5) and reliable. Also, you can get recipes for FREE from the National Center for Home Food Preservation website. Don’t take foolish chances!

Also, you must stick to the types of jars and lids indicated here:

http://nchfp.uga.edu/how/general/recomm_jars_lids.html

Currently, the so-called “reusable” canning lids are not recommended due to problems with seal failure.


Speaking of used canners, I now have one for sale. Now that I have both a brand-new All American 30 Quart Pressure Canner, and an extra Presto 16 Quart canner,  I won’t need this spare one anymore.  I am selling a Presto 16-Quart Pressure Canner and Cooker. This canner will process 12 half-pints, 10 pints, or 7 quarts and comes with an adjustable Weighted Gauge for processing at 5, 10, or 15 pounds pressure and the gasket and canning rack. I am also throwing in the instruction book.  If anyone is interested, please comment here or send me an email. . .I’ll bring it over to the Gardens for you. . .

Price Is $60.00.


Here are some canning recipes covering the most commonly grown vegetables in the Community Gardens (brought to you by the National Center for Home Food Preservation): 


Greens (Kale, Collard, Mustard, Spinach)

            http://nchfp.uga.edu/how/can_04/spinach_greens.html


Green Beans or Wax Beans

            http://nchfp.uga.edu/how/can_04/beans_snap_italian.html


Corn

            http://nchfp.uga.edu/how/can_04/corn_kernel.html


Okra

            http://nchfp.uga.edu/how/can_04/okra.html


Potatoes

            http://nchfp.uga.edu/how/can_04/potato_white.html


Sweet Potatoes

            http://nchfp.uga.edu/how/can_04/potato_sweet.html


Squash (Winter or Pumpkin ONLY.  WARNING DO NOT CAN PUMPKIN PIE FILLING AND DO NOT PUREE THE SQUASH~!! )

            http://nchfp.uga.edu/how/can_04/pumpkin_winter_squash.html


Tomatoes, Crushed

            http://nchfp.uga.edu/how/can_03/tomato_crushed.html


Tomatoes with Okra and Zucchini

            http://nchfp.uga.edu/how/can_03/tomato_okra_zucchini.html


Tomato Spaghetti Sauce

            http://nchfp.uga.edu/how/can_03/spaghetti_sauce.html


Tomato Spaghetti Sauce with Meat

            http://nchfp.uga.edu/how/can_03/spaghetti_sauce_meat.html


Tomato Salsa

            http://nchfp.uga.edu/how/can_salsa/tomato_salsa_paste_tomatoes.html


Green Peas

            http://nchfp.uga.edu/how/can_04/peas_green_shelled.html


Sauerkraut (Cabbage must be canned as Sauerkraut—You cannot can Cabbage, but you can freeze it)

            http://nchfp.uga.edu/how/can_06/sauerkraut.html

And now. . .I must mention the stuff that you should NEVER can.  It’s just too dangerous.

EXIF_JPEG_T422

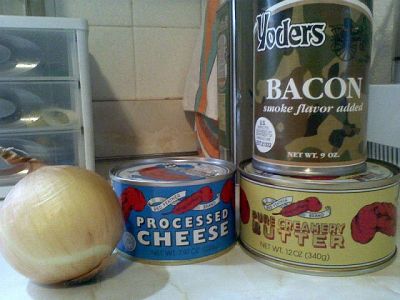
As you can see, I am showing COMMERCIALLY CANNED cheese, butter and bacon, and there is a garden-grown onion sitting next to them.   If I want stuff like canned cheese, butter and bacon for my pantry, I BUY it from stores, but I will NEVER attempt to can these things at home.

I am saying this because there are boucoup internet websites that seem to convey the idea that canning bacon, cheese and butter at home is cool.  Well, folks, it is NOT COOL.

Yes, it does sound like a good idea to can stuff like bacon, but the simple fact is that there are NO home canning recipes for these things that are safe.  Bacon, for example, is far too oily to can and attempting to can it will result in seal failure because the bacon fat will coat the rim of the jar and the seal during the canning process and cause seal failure.  The same thing will happen with cheese and butter.  Furthermore, the milk sugars in cheese will caramelize during the canning process and the resultant product will be as hard as a rock and inedible.   Finally, there are no scientifically accurate recipes that give any accurate times for canning bacon, cheese and butter.  So if you want to store these items in your pantry in case of an emergency or keep them for winter storage, BUY them commercially canned, or else buy them at the supermarket and FREEZE them.  Bacon, cheese and butter will keep very well in air-tight bags in the FREEZER.

But what about that onion?  Well, for some reason, onions are also dangerous to can by themselves.

Well, the only safe way to can an onion is to pickle it.   A BIT of chopped onion can be added to some canning recipes and processed  (such as in Spaghetti Sauce), but generally, citric acid or vinegar is added to these recipes as well to acidify them.  In every other case, onions are pickled in vinegar brine or they are part of pickle recipes.  The only safe ways to prepare onions for storage is to chop and FREEZE them, or dehydrate them.    For example, I wanted to store caramelized onions for French Onion Soup, so after preparing them, I put them in freezer bags and placed them in the freezer for keeping.  One other way to keep onions for at least a little while is to dry them out and store them in a wooden box in your basement if your basement is cool, clean and dry.   For the onion, canning is out of the question.

And now, that EGGPLANT recipe.  I use this one.  It’s great! Absolutely delicious and the eggplant gets eaten up very quickly with this one.

Courtesy, Wandering Chopsticks. . .

http://wanderingchopsticks.blogspot.com/2008/08/ca-tim-nhan-cha-tom-vietnamese-eggplant.html

As usual, comments are very welcome. . .


Another Garden Season is Upon Us. . .

Even though it is Farm Show Week, it is NOT TOO EARLY to start thinking about your garden and what you will plant when the gardens open (hopefully) in March.  They opened on March 17th last year, and considering that date, we could have only about 68-70 days until the gardens open once more.  In terms of weeks, that’s about 11 weeks—not a long time at all. That isn’t very long, and so you need to be thinking about what you will plant and when.


It is certain that the seed catalog companies are thinking about you and your garden.  I am simply inundated with catalogs.  Just to see if anyone is paying attention to this blog, I intend to leave a generous supply of seed catalogs on the Picnic Table over in the gardens on Saturday next, weather permitting.  The catalogs will be in a plastic bag.  Some will be 2012 catalogs, but there will be a few very nice 2013 ones there as well, including a Baker Creek Seeds Heirloom catalog.  Some fortunate person will have interesting reading over the winter. . .


EXIF_JPEG_T422


In a past issue of this blog I mentioned the need to PLAN YOUR GARDEN.  Planning is absolutely essential to having a good harvest.  Planning is especially necessary if you only have one or two plots to work with.  A garden plan will save time, space and money. You will get much more out of your garden and you will be able to increase the length of the harvest season, at least well into the fall of 2013. You will make proper and complete use of your space, which alleviates crowding of vegetables or encroachment on areas where you should not encroach.

There are two ways to make up a garden plan. First, you can do it manually. Start by  making a scale drawing of your available garden area on graph paper. You can get graph paper at any office supply store—you will find it in among the school supplies. Divide the drawing into cool-season and warm-season vegetable planting areas.

Cool-season vegetables                           Warm-Season vegetables

Onions                                                                        Corn

Cabbage                                                                     Tomatoes

Sweet Peas                                                                Green Beans and Dry Beans

Radishes                                                                    Peppers

Collards                                                                     Okra

Kale                                                                             Potatoes  and Sweet Potatoes

Mustard Greens                                                     Summer Squash

Lettuces                                                                    Winter Squash

Spinach                                                                      Cucumbers

Broccoli                                                                     Eggplant


Cool-season vegetables can generally be planted as soon as the garden can be worked. These plants LOVE the cool early spring weather, and generally do better early in the season.  They can withstand some frost. They also flourish then because there are LESS BUGS to disturb them.  But the veggies on the Warm-season list cannot be planted until AFTER the last frost date for our area, which is ON OR ABOUT MAY 5.  White potatoes are an exception, as they can generally be planted by mid-April.  In the case of corn, it should not be planted until the soil has warmed up to about 55-60 degrees.  Also, both the NIGHTS and the days must be warm (temperatures at or above 55 degrees) if corn is to be successful.


Anyway, you plant your Cool-Season veggies early and harvest them before the summer heat begins, so that that area of your garden can then be used for the Warm-Season veggies.  This allows you to use your space to best advantage.


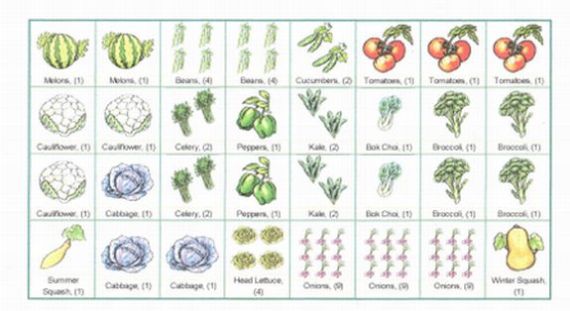
The Other Way that you can easily plan your garden is to use the Grow Veg Garden Planner mentioned in the blog post:  found here:

Planning

There is a free trial period, but after 30 days you must buy a subscription.  It is well worth it because of all of the beneficial helps this planner provides.  This is the planner I use.

samplegardenplan

Some of the Cool-Season veggies can be sown directly from seed as soon as you have worked your garden after it opens, but generally broccoli, cabbage and onions will do better if planted as PLANTS.  This can be done two ways.  You can wait until the Home Centers stock veggie plants and buy them (poor selection) or you can start them from seed (great selection).  Did you know that last year the ONLY veggie that was planted as a purchased plant in my garden was Eggplant.  All of the other plants that I set out were from seed that I started at home, or from seed that was directly sown. Starting your own plants from seed saves an enormous amount of money and it allows you to plant favorite, heirloom or unusual varieties that are not found in the Home Centers.

Cool-season vegetables

Onions                         Set out plants in March

Cabbage                      Start seed indoors by March 1; set out April 1

Sweet Peas                Direct Sow in March

Radishes                     Direct Sow in March

Collards                      Direct Sow April 1

Kale                              Direct Sow April 1

Mustard Greens      Direct Sow April 1

Lettuces                     Direct Sow in March

Spinach                      Direct Sow April 1

Broccoli                     Start seed indoors by March 1; set out by April 15


Warm-Season vegetables

Corn                             Direct sow between May 6 and June 15; Avoid corn plants!

Tomatoes                   Start seed indoors by March 1; plant out May 15

Green Beans              Direct Sow May 1

Dry Beans                  Direct Sow May 1

Peppers                       Start Indoors Feb 28; plant out May 15

Okra                              Direct Sow May 15

Potatoes                      Plant by April 15

Sweet Potatoes         Plant slips after May 15

Summer Squash       Direct sow between May 15 and May 31

Winter Squash          Direct sow between May 15 and May 31

Cucumbers                 Direct sow May 1

Eggplant                      Set out plants May 15


As far as the proper technique for starting seeds indoors is concerned, I had given complete instructions in a previous blog.  Three of the most important instructions are: (1) CLEANLINESS!  Everything must be very clean; (2) Do not use any fertilizers on seedlings, and; (3) Do not use seed starters based on peat moss or peat pots of any type. If these reminders bring forth questions, then you will have to re-read the blog in question.


Not Too Early to Talk About Preserving the Harvest. . .

In my last post, which was (shamefully) back at the end of July, I promised to talk about Preserving the Harvest by dehydrating vegetables.

EXIF_JPEG_T422

This is my Vegi Kiln food dehydrator.  This device is used to dry vegetables and meats for storage.

EXIF_JPEG_T422

Although you can dry food by placing it out in the sun, or by using the oven (if the oven on your stove can be turned down to at least 140 degrees), the most efficient and least expensive way to dry food is by using a dehydrator designed for the purpose.  The reason why is because if you intend to dry food in the sun, you must build or buy special trays for that purpose and you must observe the food at all times to make sure that bugs or birds haven’t gotten into it.  Also, kitchen stoves are not generally equipped with fans to keep  the air circulating about the food and so it takes a much longer time to dry things in the oven and the energy cost is higher.  Initially, a food dehydrator will cost somewhere between $50 and $400 (the one I own is closer to the upper end in price), but it is well worth the cost to have an easy way to preserve your food that does not require the use of a freezer or canning supplies.

EXIF_JPEG_T422

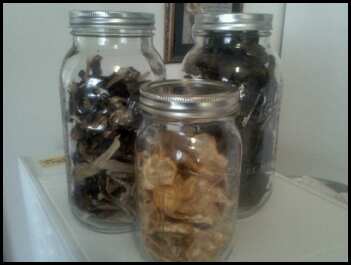
This illustration shows eggplant, green peppers and summer squash that has been dried and sealed into jars.  The Half-Gallon jars in the background contain the equivalent of about 20 pounds each of eggplant and green peppers, and the quart jar in from contains the equivalent of about 10 pounds of dried summer squash.  To prepare these dried vegetables for cooking all you have to do is soak them in some water.  You can also simply add them to a soup and they will be fine.  I have also dried celery, collards, kale, okra, hot peppers and onions.  The really nice thing about storing food as dried goods is that it is lightweight and takes up far less space than traditionally canned or frozen foods.  For example, 20 pounds of tomatoes can be dried down to a pile that weighs only about 18 ounces. Drying is ideal for limited-space situations, such as apartment  or small home living.  The actual process of drying veggies and fruits is fairly simple.  Veggies are washed and cut into serving-sized pieces and blanched and drained, as if preparing them for the freezer.  The cut pieces are laid out in the dehydrator and the dehydrator is set for the specific temperature.  The drying veggies are then left for the appropriate amount of time until they are dry and brittle in texture. Fruits can be washed, cut and dried as serving sized pieces or they can be made into fruit leathers and dried that way.  There are easy to follow instructions and recipes here:

http://nchfp.uga.edu/publications/uga/uga_dry_fruit.pdf

Next time, I’ll talk a little bit about prepping the garden for another season, and give some neighborly reminders.  I’ll also talk about the reason why you should care where your garden plants and seeds come from.


Stir-Fried Lettuce and other interesting stuff. . .

“Stir Fried Lettuce!” What the Heck!

More about that later.   . .

Whew!   What  a Job it was this week getting the garden completely planted before the rain came, but the job is done.  Tomatoes, peppers, potatoes, corn cucumbers, onions, beans, celery,  eggplant  (AND LETTUCE) all in!

I noticed that many people have nearly completed their planting and the gardens look beautiful with all of the growing veggies.  This rain will help a lot, and when the sun comes out, everything will POP.

Everything.  Including the weeds.

Let’s face it.  In about a month from now, the weeds are going to get so bad that some people will simply up and quit.  The problem for those of us that remain is that the weeds in the abandoned summertime gardens will mature and quickly go to seed, spreading their little “children” into our gardens.  It doesn’t seem fair at all that some people will rent garden space and simply let that space grow over in weeds.

Sometimes, I think that there should be TWO garden checks; one in early May to make sure that gardens are actually being used and one in Mid-June to make sure that gardens are being TENDED.  If a garden spot is not being used or tended, it should be re-rented at half price to someone on the waiting list. . .oh well.  >Getting off soapbox now. . .<

Just a reminder that the easiest way to deal with the weeds is to attack them when they are small.  After they get big, they are very difficult to remove unless you rototill them under, and some of them shouldn’t be rototilled at all (Thistles, for example.  If you cut them to pieces, you need to remove all of the pieces or else those bits will take root and form new Thistle plants).  And you never want to wait until the weeds start to bloom.  They will just go to seed then and make an even bigger mess of your garden.  In a previous post I mentioned how removing the weeds when they are young reduces the number of weed seeds in the soil and this will cause you to have LESS WEEDS both this season and next.  When they are small and the ground is softened by rain, they are easy to tear out with the hoe.  Another quick way to deal with them is to simply whack them down with a weed whacker or lawn mower.  That, at least, will keep them from flowering and spreading, and the garden will have a well-tended appearance.

Yes, the gardens will soon be producing nice salad greens and greens for stir-fries.  This means that we all need to think about canning and preserving what we have NOW.  This installment of the Dusty Hoe will include some unusual recipes as well as freezing  tips.  We also need to be mindful that nothing goes to waste.     Not even the extra Lettuce.

One very good way to prevent waste is to participate this year with Channels Food Rescue’s PLANT A ROW FOR THE HUNGRY.   I had previously written about how hungry people sometimes actually come to the garden seeking food, and it is still a good thing to help out honest-hearted people who are looking for help.  Participating with Channels Food Rescue by giving your garden’s overflow will help out with some of this need.  I have deliberately planted some extra to give away.  Remember, there but for the Grace of God go each and every one of us.  Please share your blessings!

In some previous posts, I went over the proper procedures for canning and freezing.  I recently found this website which  provides some additional guidance about freezing vegetables in particular.

http://nchfp.uga.edu/how/freeze.html

This website is really good since it tells you exactly what DOES NOT FREEZE well and why. This is information from the National Center for Home Food Preservation–highly reliable.

By the end of Spring, many gardens will actually have lettuce going to seed.  Ugh!  Old lettuce is pretty nasty, too.  It is bitter and worthless.  Why not pick that lettuce while it is young and enjoy it.

Okay.  So you’ve eaten enough salad.  But did you know that lettuce can be preserved by canning (as a soup) or it can be sauteed, stir-fired and eaten as a side dish?  And stir-frying lettuce is a lovely way to use a lot of it quickly because it cooks down to small portions.  For example, a head of iceberg or 3-4 heads of Romaine will generally feed between 3-4 people.  What a wonderful vegetarian dish or a really nice alternative to serving cole slaw with barbeque!

Stir Fried Romaine Courtesy “Elinluv’s Tidbits”

Stir-Fried Lettuce (from About.Com)

Sick of lettuce in salads?  Try this as a side dish! I have, and it is delicious!

As a rule, the Chinese do not eat raw vegetables, and lettuce is no exception. This is a great side dish for Chinese New Year, as lettuce is considered to be a “lucky” food. Serves 4 – 6.

Ingredients:

1 head iceburg lettuce (or an equivalent amount of Romaine or Leaf Lettuce)

2 teaspoons soy sauce

1 1/2 teaspoons Chinese rice wine or dry sherry

3/4 teaspoon granulated sugar

1 1/2 tablespoons vegetable or peanut oil

2 garlic cloves, peeled and minced

1 1/2 teaspoons minced ginger

1/8 – 1/4 teaspoon red pepper flakes

1/2 teaspoon salt

1/2 teaspoon Asian sesame oil

1 cup cubed fermented Tofu (optional)

Preparation:

1. Wash the lettuce, drain and separate the leaves. It’s important to make sure the lettuce is dry). Cut across the leaves into pieces about 1 inch wide.

2. Combine the rice wine or dry sherry, soy sauce, and sugar in a small bowl, stirring. Set aside.

3. Heat a wok on medium-high heat and add oil. When the oil is hot, add the garlic, ginger and red pepper flakes. Stir-fry until aromatic (5 – 10 seconds) and add the lettuce and tofu (if you wish). Stir-fry the lettuce, sprinkling with the salt, for 1 – 2 minutes, until the leaves begin to wilt.

4. Give the sauce a quick re-stir and swirl it into the wok. Stir-fry for 1 – 2 more minutes, until the lettuce turns dark green. Remove from the heat and stir in the sesame oil. Serve immediately.

Here’s another version from  SeriousEats.Com—this one includes Cabbage

1 teaspoon soy sauce

1 teaspoon sesame oil

1 teaspoon rice wine or dry sherry

3⁄4 teaspoon sugar

1⁄2 teaspoon freshly ground black pepper

1/4 cup peanut oil or canola oil

4 scallions, cut on the diagonal into 1″ pieces

3 cloves garlic, minced

1⁄2 head iceberg lettuce, cored, outermost leaves discarded, inner leaves torn into 4-inch pieces

1 cup canned diced tomatoes, drained  (fresh tomatoes work well too!)

1 head cabbage, cored, outer leaves discarded, cut into 1-inch pieces

Kosher salt, to taste

1 small hot red pepper (optional)

Combine soy sauce, sesame oil, sherry, sugar, and black pepper in a bowl. Stir to mix. This is your sauce. Set aside, but keep it close to your pan.   Heat a large nonstick skillet over high heat, about 3 or 4 minutes, or until very hot. Add peanut  or canola oil. Immediately add garlic, tomatoes  and half the scallions. After 5 or 10 seconds, once the garlic starts to change color, add cabbage.  Cover and cook 15-20 minutes.  Cabbage will cook down.  Add lettuce. Saute 60 seconds, stirring every so often. Add sauce. Cook another 60 seconds, stirring so all the lettuce  and cabbage gets some of the sauce. Kill heat. Salt to taste. Remove to a bowl. Top with extra scallions and serve.

Lettuce Soup–

You can make a very simple form of lettuce soup by just simmering some chicken or vegetable stock and dropping some washed and roughly chopped-up lettuce into it.  The soup can be enhanced by adding other vegetables or even pieces of meat if you desire (beef, chicken or even shrimp).   A good dinner starter or lunch.  Lettuce can also take the place of Spinach or Kale in Italian Wedding Soup.

http://www.foodnetwork.com/recipes/emeril-lagasse/lettuce-soup-recipe2/index.html

This is the best lettuce soup recipe that I have found.  In order to finish the soup, it has to be processed in a food processor or blender before the cream is added.  Delicious!  You can also can this, but if you do can it, OMIT the olive oil for sauteeing the onions (just spray the pan LIGHTLY with PAM) and DO NOT ADD THE HEAVY CREAM or the CHIVES.  After cooking and processing the soup WITHOUT the Olive Oil, Cream and Chives, put it into sterilized hot pint jars  apply seals and process in a Pressure Canner (NOT A WATER BATH CANNER!) at 15 pounds pressure for 25 minutes.  When the soup is served later, simmer for 10 minutes, add heavy cream and garnish with chives.

In the next installment of this Blog, I will talk all about DRYING and preserving veggies.  Did you know, for example, that DRYING is a great way to preserve greens?  It also saves space, but to be successful, it must be done properly.  I will tell you all about that later.

People are Forgetting their Etiquette Again. . .

I wasn’t going to mention this at all, but it is really bugging me.   It seems that this year, I am once again cursed with bad neighbors!  First, there is the neighbor that irritated me by boasting that he had a garden spot three feet wider (due to inaccurate measuring by County Parks Staff). No starting out with “howdy,” just a gloat over the amount of extra space he has.  Guess where his additional three feet came from?  MY SPACE!  We were shorted three feet and barely had enough space to plant all of our potatoes.  In fact, all of the neighbors down from us were also shorted by mistake. I know THAT isn’t his fault, but the NERVE of some people.  He actually boasted and gloated over having the extra space, and made bad matters worse by complaining to other gardeners about MY REACTION to his gloat which was not a happy one.  Did he think I’d be happy to hear about the space I lost? Little did he know that the very people that he complained to know me and they told me about his rants.  I don’t know about anyone else, but no normal person wants to hear gloating about something like this.  I know that no one is perfect, but if you discover that your garden is not the right size and the blue marker stakes are the cause of the issue, BE MATURE– DO THE NEIGHBORLY THING and keep that information to yourself.  Bring it up at the annual picnic.  And don’t gloat out loud because your garden is larger than your neighbor’s .  This guy is clearly a fool. A friendly “howdy-do” as an opening statement would have been much better received!!

AND NOPE!  I’m not going to tell you WHERE it happened in the Community Gardens.  I am not an idiot like this guy. . .

But even worse is the neighbor who has expanded his or her share of  space in the Children’s Garden to include the entire walkway that leads to the Water Pump. They have arbitrarily expanded the size of their lots from 10 x 10 to something like 10 x 15 each, causing other people’s gardens to be “landlocked”.  They did this by removing the marker stakes, which is against the rules.  They may have encroached on other people’s space as well. I don’t believe that a child is doing this.  I think some adult scofflaw who thinks that garden rules don’t apply to them is involved. I telephoned Parks and Recreation to complain, and someone   supposedly took care of the problem bu resetting the stakes, but the scofflaw has once again taken over the path by pulling out the stakes that were reset,  leaving a space so narrow that people have to “tightrope walk” to get water.  In fact, the space is too narrow to use for people like me and my neighbor, because both of us have had recent knee surgery.   The path is impossible to use with a wagon or a garden cart.  People who ordinarily use wagons to get their water must drive to the pump in order to haul a sufficient amount of water away.  A lot of gardeners have expressed frustration and anger over the situation, but I don’t know whether or not anyone else has complained. It seems that people are just grumbling.  If everyone who is being inconvenienced complains, I think we will get action.  The telephone number is on the back of your Garden ID Card(s). In the meantime, I will telephone again and I will bring this matter up at the annual picnic if necessary.  Interestingly, this person did the same thing last year and there were complaints.  Hopefully,they will be permanently banned for bad behavior this time.

These are just two examples of  “Garden Hogs” who are making things unpleasant for everyone.  Please Don’t Forget Your Etiquette!   And happy growing to everyone, no.  matter.   what. . .

You CAN start a garden from seed. . .

Last year, I had very good success in starting plants from seeds.  In fact, ALL of my tomatoes, cucumbers, squash, cabbage, hot peppers and sweet peppers were all started from seeds that I planted during the winter months. By the time the gardens opened (LATE, I might add!) the plants were large and healthy enough to set out.  My harvest was excellent!  Not to mention that I was able to grow unusual varieties such as “Flying Saucer” squash, “Cool Breeze” and “Homemade Pickles” cucumbers, “Black Sea Man”, “Paul Robeson” and “Amish Paste” tomatoes, “Caraflex” and “Baby Choi” cabbage, “Kung Pao” and “Ancho” hot peppers and “Goliath” , “Gypsy” and “Fooled You” sweet peppers.   It is TRUE:  growing from seed allows you much better choices than the plants found in local home centers and gardening stores.

This year, I am going to grow more Oriental Greens, herbs for Vietnamese PHO soup, and a bush celery called “Par-Cel”.  You will never find this in the stores locally, but growing from seeds makes it all possible!

Many gardeners don’t bother growing from seed.  They have suffered all of the pitfalls (and there are a few) and they simply want to have a sure thing.  I understand perfectly.  So they go to the local home centers or garden stores and buy whatever plants are there.  The problem with this is that you are stuck with someone else’ s choices.

For example, I plant only heirloom tomatoes.  Leggy, indeterminate vines, but the rich delicious flavor cannot be beat.  Also, the QUALITYof the fruit!  Last year, I was harvesting plum (paste) tomatoes that weighed at least a pound apiece.  And the sauces and ketchup I made was outstanding!  But you can only get this from starting from seed.  None of the local garden shops carried the species of tomato I planted.

Also, if you are a seed saver (I am), you can actually save seeds and plant them for the next season if you grow the heirlooms.  You cannot save the seeds from the hybrids that most home centers and garden shops sell. Plus attempting to save and grow hybrid seeds is ILLEGAL because the plants are patented.  Betcha didn’t know that!!The number one reason why gardeners give up on starting from seeds is that the seedlings fail.  And the top two reasons why seedlings fail is leggy-ness and Damping Off Disease.  In this episode of The Dusty Hoe, I am going to give some tips that will make growing your garden from seeds much more successful.

Leggyness

We have all seen this.  Your seedlings come up just fine, then they start to grow longer and longer stems, generally stretching in one direction or another.  This problem is called “leggyness,” and it is caused by only one thing:  lack of light.

Seedlings that are planted in areas of inadequate light will “stretch out” toward the direction of any available light so that photosynsthesis can occur.Photosynthesis is the way plants get their food and survive.  A simple solution is to make sure that the seedlings have plenty of light for at least 14 hours per day.  In a previous blog, I told you how to build a grow-light system.  If a plant does turn leggy, you can help it by replanting it.  Simply get a larger pot (clean and sterilized, of course) and replant.  Bury the plant up to within a few milimeters of the leaves.  Make sure the plant gets plenty of light after that.   The long stem will become a root and then the leggyness problem will be solved.   Doing this helped me to save a number of my tomato plants last year. . .

Damping Off Disease

Damping Off is the most disappointing thing about growing a garden from seed.  Every gardener has seen it:  your seeds germinate and the little plants come up. Then, within a few short days, those small seedlings start to wilt.  The stem gets a “pinched” appearance at its base, and then the plant stretches out, topples over and dies.  When you look closely, it almost seems as if the stem has been cut off at the soil level and the soil itself is covered with mold.  What’s worse is that Damping Off disease is contagious. It can quickly spread from plant to plant.  It’s a bad start to the new gardening season.

This problem is so common and so disappointing that many people simply refuse to buy seeds at all. Many gardeners who resort to the purchase of expensive plants will tell you that it is just too much trouble to start seeds at home.  For them, the plants are a sure thing and the seeds are a gamble.  And it is both frustrating and time consuming to watch seedlings so carefully planted die, causing you to have to start all over again.  But Damping Off is preventable.  By following some easy tips, you can be successful at starting a whole garden from seed.

Damping Off Disease is caused by a fungus that normally lives in soil.  It loves cool, dark, wet or damp places.  Lack of air circulation also encourages its growth.  Also excess nitrogen in the soil feeds the growth of this disease.  Like I said previously, Damping Off is contagious; that is to say that it is airborne and spreads easily from one plant to another.  Once you have a single cell in a tray full of plants affected, it will not be long until the entire tray is destroyed.

Many gardeners make the mistake of starting their seeds indoors, in the basement.  This is not good because cool basements are breeding grounds for this disease.  Also, some gardeners forget to WASH  their seedling trays and equipment before use.  This allows the disease to spread to from contaminated trays to the new seedlings that are planted.  Here’s some really good news….. Damping Off Disease can be easily prevented.

(1)       Make sure that your trays and pots are CLEAN.  Wash all of your pots (if plastic ), trays and seed handling equipment.  If you use clay pots, they may have to be discarded if contaminated with Damping Off.  Clay is porous and difficult to properly clean.  A simple wash with a LITTLE dish soap and a good rinse in hot water to which Hydrogen Peroxide has been added (see formula below) will do.  Afterward, dry thoroughly.  Equipment that you are not going to use immediately should be stored in a CLEAN plastic or paper bag so it stays clean.

(2)      Don’t start your seeds in the basement if your basement is not above ground.

(3)      Use only sterilized seed starting soil.  Don’t use old garden soil or potting soil that is not sterile. This is the secret of greenhouse growers and farmers everywhere.

(4)      Avoid the use of peat pots.  I wrote about their problems in a previous blog.

(5)       If Damping Off happens, act immediately to eliminate it. Remove diseased plants and their pots from your trays so it doesn’t spread.   Replant, if needed, in fresh sterilized soil and clean containers. Throw the old soil into the compost bin or else discard it. Do not reuse the soil. Wash and sterilize any pots that you save.

(6)      Make sure that your seedlings get as much light and air as possible.

(7)      NEVER use so-called “humidity domes” on your seedling trays. Let the air circulate.

(8)      Allow the soil to dry out between watering.  Watering from the bottom is best.

(9)      Use only Distilled water to water your seedlings.

(10)  Do not use any type of fertilizer on your seedlings.  NOPE, not even the blue stuff that you add to water.  Nitrogen in the fertilizer will cause Damping Off Disease.

Some people believe that there are certain home remedies for Damping Off.  Gardeners have reported success with the following:

–Soaking seeds in a small amount of water to which a crushed clove of garlic had been added;

–Misting or watering the seedlings with Chamomile tea;

–Dusting a little bit of fireplace ashes over the top of the soil after the seeds are planted;

–Dusting a little bit of Cinnamon over the top of the soil after the seeds are planted.

Hydrogen Peroxide Solution for sterilizing seed growing equipment:

A Hydrogen Peroxide solution may be made using the same Hydrogen Peroxide that you find in drugstores and supermarkets (3%) , by adding it to a gallon of distilled water as follows:

1 to 4 Tablespoons; for watering seedlings and potted plants. Prevents Damping Off.

3 to 6 Tablespoons; for watering outdoor plants.

5 to 8 Tablespoons; for dipping seeds or roots prior to planting or repotting.

10 Tablespoons for rinsing pots and trays.

Full strength for cleaning tools and wiping down work areas.

Next time, we’ll talk about garden planning again.  Planning is the only sure way to make sure your space is utilized to the maximum!